基础设置
- 在 Windows 上用 WSL 优雅开发
- 限制 wsl2 占用过多内存
- 配置 WSL2 使用 Windows 代理上网
- WSL 中的高级设置配置
- 将版本从 WSL 1 升级到 WSL 2
wsl --set-version <ubuntu名字> 2
重启命令
wsl -t Ubuntu-20.04Proxy
WSL2 连接到宿主 Windows 程序的网络代理设置 最终测试成功
https://zinglix.xyz/2020/04/18/wsl2-proxy/
WSL2 内使用 windows 的 v2ray 代理配置方式
https://www.jianshu.com/p/ba2cf239ebe0
出现的问题分析:可以双方 ping 通,不设置代理可以双方访问,设置代理就无法请求,v2ray 未收到请求。
关闭所有防火墙正常连接,重置防火墙后无法连接。
定位关键问题:
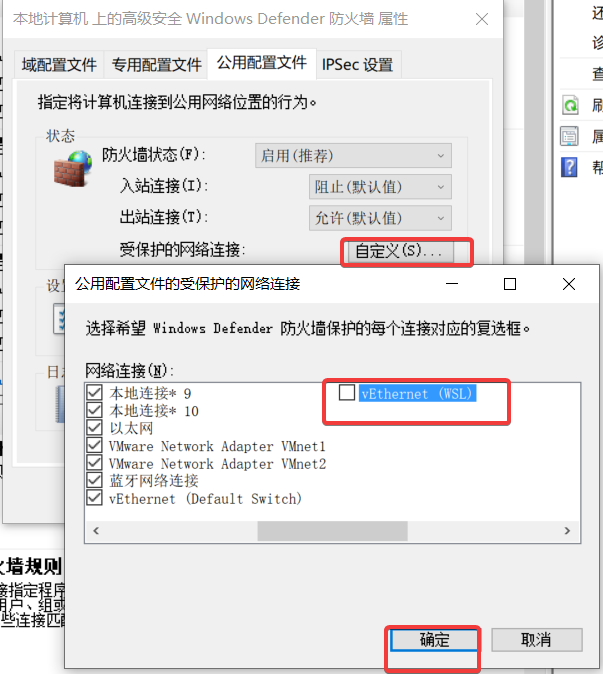
- 高级安全 Windows Defender 防火墙
- 本地计算机上的高级安全 Windows Defender 防火墙
- 操作->属性
- 把 wsl 的网卡防火墙关掉,重启可能会失效
很多软件不支持 socks5,建议使用 http 协议代理
.bashrc
# ~/.bashrc: executed by bash(1) for non-login shells.
# see /usr/share/doc/bash/examples/startup-files (in the package bash-doc)
# for examples
umask 022
PATH="$HOME/bin:$HOME/.poetry/bin:$HOME/.local/bin:$PATH"

# If not running interactively, don't do anything
case $- in
    *i*) ;;
      *) return;;
esac

# don't put duplicate lines or lines starting with space in the history.
# See bash(1) for more options
HISTCONTROL=ignoreboth

# append to the history file, don't overwrite it
shopt -s histappend

# for setting history length see HISTSIZE and HISTFILESIZE in bash(1)
HISTSIZE=1000
HISTFILESIZE=2000

# check the window size after each command and, if necessary,
# update the values of LINES and COLUMNS.
shopt -s checkwinsize

# If set, the pattern "**" used in a pathname expansion context will
# match all files and zero or more directories and subdirectories.
#shopt -s globstar

# make less more friendly for non-text input files, see lesspipe(1)
[ -x /usr/bin/lesspipe ] && eval "$(SHELL=/bin/sh lesspipe)"

# set variable identifying the chroot you work in (used in the prompt below)
if [ -z "${debian_chroot:-}" ] && [ -r /etc/debian_chroot ]; then
    debian_chroot=$(cat /etc/debian_chroot)
fi

# set a fancy prompt (non-color, unless we know we "want" color)
case "$TERM" in
    xterm-color|*-256color) color_prompt=yes;;
esac

# uncomment for a colored prompt, if the terminal has the capability; turned
# off by default to not distract the user: the focus in a terminal window
# should be on the output of commands, not on the prompt
#force_color_prompt=yes

if [ -n "$force_color_prompt" ]; then
    if [ -x /usr/bin/tput ] && tput setaf 1 >&/dev/null; then
 # We have color support; assume it's compliant with Ecma-48
 # (ISO/IEC-6429). (Lack of such support is extremely rare, and such
 # a case would tend to support setf rather than setaf.)
 color_prompt=yes
    else
 color_prompt=
    fi
fi

if [ "$color_prompt" = yes ]; then
    PS1='${debian_chroot:+($debian_chroot)}\[\033[01;32m\]\u:\[\033[01;34m\]\w\[\033[0;35m\]$(__git_ps1 " [%s]")\[\033[00m\] \$ '
else
    PS1='${debian_chroot:+($debian_chroot)}\u@\h: \w $(__git_ps1 " [%s]") \$ '
fi
unset color_prompt force_color_prompt

# If this is an xterm set the title to user@host:dir
case "$TERM" in
xterm*|rxvt*)
    PS1="\[\e]0;${debian_chroot:+($debian_chroot)}\u@\h: \w \a\]$PS1"
    ;;
*)
    ;;
esac

case "$TERM" in
    st-*)
        PROMPT_COMMAND='echo -ne "\033]0;st - $PWD\007"'
    ;;
esac

# enable color support of ls and also add handy aliases
if [ -x /usr/bin/dircolors ]; then
    test -r ~/.dircolors && eval "$(dircolors -b ~/.dircolors)" || eval "$(dircolors -b)"
    alias ls='ls --color=auto'
    #alias dir='dir --color=auto'
    #alias vdir='vdir --color=auto'

    alias grep='grep --color=auto'
    alias fgrep='fgrep --color=auto'
    alias egrep='egrep --color=auto'
fi

# colored GCC warnings and errors
#export GCC_COLORS='error=01;31:warning=01;35:note=01;36:caret=01;32:locus=01:quote=01'

# some more ls aliases
alias ll='ls -alF'
alias la='ls -A'
alias l='ls -CF'

# Add an "alert" alias for long running commands.  Use like so:
#   sleep 10; alert
alias alert='notify-send --urgency=low -i "$([ $? = 0 ] && echo terminal || echo error)" "$(history|tail -n1|sed -e '\''s/^\s*[0-9]\+\s*//;s/[;&|]\s*alert$//'\'')"'

# Alias definitions.
# You may want to put all your additions into a separate file like
# ~/.bash_aliases, instead of adding them here directly.
# See /usr/share/doc/bash-doc/examples in the bash-doc package.

if [ -f ~/.bash_aliases ]; then
    . ~/.bash_aliases
fi

# enable programmable completion features (you don't need to enable
# this, if it's already enabled in /etc/bash.bashrc and /etc/profile
# sources /etc/bash.bashrc).
if ! shopt -oq posix; then
  if [ -f /usr/share/bash-completion/bash_completion ]; then
    . /usr/share/bash-completion/bash_completion
  elif [ -f /etc/bash_completion ]; then
    . /etc/bash_completion
  fi
fi

# Configure the Git PS1 prompt
GIT_PS1_SHOWDIRTYSTATE=true
GIT_PS1_SHOWSTASHSTATE=true
GIT_PS1_SHOWUNTRACKEDFILES=true

# SSH keychain
# eval `keychain --quiet --eval --agents ssh id_rsa`

# Load Environment Variables for coding projects
if [ -d ~/.project_env ]; then
    if ! [ -z "$(ls -A ~/.project_env)" ]; then
        for envf in ~/.project_env/*; do
            export $(grep -v '^#' $envf | xargs -d '\n')
        done
    fi
fi

export NVM_DIR="$([ -z "${XDG_CONFIG_HOME-}" ] && printf %s "${HOME}/.nvm" || printf %s "${XDG_CONFIG_HOME}/nvm")"
[ -s "$NVM_DIR/nvm.sh" ] && \. "$NVM_DIR/nvm.sh" # This loads nvm

# 代理设置
export hostip=$(ip route | grep default | awk '{print $3}')
export hostport=58883 # 局域网连接端口
alias proxy='
    export HTTPS_PROXY="http://${hostip}:${hostport}";
    export HTTP_PROXY="http://${hostip}:${hostport}";
    export ALL_PROXY="http://${hostip}:${hostport}";
    echo -e "Acquire::http::Proxy \"http://${hostip}:${hostport}\";" | sudo tee -a /etc/apt/apt.conf.d/proxy.conf > /dev/null;
    echo -e "Acquire::https::Proxy \"http://${hostip}:${hostport}\";" | sudo tee -a /etc/apt/apt.conf.d/proxy.conf > /dev/null;
'
alias unproxy='
    unset HTTPS_PROXY;
    unset HTTP_PROXY;
    unset ALL_PROXY;
    sudo sed -i -e '/Acquire::http::Proxy/d' /etc/apt/apt.conf.d/proxy.conf;
    sudo sed -i -e '/Acquire::https::Proxy/d' /etc/apt/apt.conf.d/proxy.conf;'

[ -s "$NVM_DIR/bash_completion" ] && \. "$NVM_DIR/bash_completion"  # This loads nvm bash_completion

# yarn 全局环境变量
export PATH="$PATH:${HOME}/.yarn/bin"
export PATH="/usr/bin:$PATH"
# >>> conda initialize >>>
# !! Contents within this block are managed by 'conda init' !!
__conda_setup="$('/home/eis/miniconda3/bin/conda' 'shell.bash' 'hook' 2> /dev/null)"
if [ $? -eq 0 ]; then
    eval "$__conda_setup"
else
    if [ -f "/home/eis/miniconda3/etc/profile.d/conda.sh" ]; then
        . "/home/eis/miniconda3/etc/profile.d/conda.sh"
    else
        export PATH="/home/eis/miniconda3/bin:$PATH"
    fi
fi
unset __conda_setup
# <<< conda initialize <<<
nvm
curl -o- https://raw.githubusercontent.com/nvm-sh/nvm/v0.39.1/install.sh | bashyarn 全局访问
https://stackoverflow.com/questions/40317578/yarn-global-command-not-working
npm i yarn -g
yarn global bin
设置 ssh 秘钥权限
设置文件内所有文件
sudo chmod -R 700 ~/.ssh配置 code 命令
VSCode Server 会自动安装 Code 命令,这样配置的打开路径将会在 WSL 外。
.bashrc
alias code="/mnt/c/Users/Kis/AppData/Local/Programs/>Microsoft\ VS\ Code/Code.exe"
VSCode ssh remote 非 WSL 时使用
系统支持列表,不支持 ubuntu32 位系统
# 代理设置
# export hostip=$(ip route | grep default | awk '{print $3}')
export hostip="192.168.1.101"
export hostport=58883 # 局域网连接端口
alias proxy='
    export HTTPS_PROXY="http://${hostip}:${hostport}";
    export HTTP_PROXY="http://${hostip}:${hostport}";
    export ALL_PROXY="http://${hostip}:${hostport}";
    echo -e "Acquire::http::Proxy \"http://${hostip}:${hostport}\";" | sudo tee -a /etc/apt/apt.conf.d/proxy.conf > /dev/null;
    echo -e "Acquire::https::Proxy \"http://${hostip}:${hostport}\";" | sudo tee -a /etc/apt/apt.conf.d/proxy.conf > /dev/null;
'
alias unproxy='
    unset HTTPS_PROXY;
    unset HTTP_PROXY;
    unset ALL_PROXY;
    sudo sed -i -e '/Acquire::http::Proxy/d' /etc/apt/apt.conf.d/proxy.conf;
    sudo sed -i -e '/Acquire::https::Proxy/d' /etc/apt/apt.conf.d/proxy.conf;'
// 先卸载
sudo apt-get remove openssh-server
// 安装
sudo apt-get install openssh-server
//重启sshd服务
sudo service ssh --full-restart
sudo vim /etc/ssh/sshd_config设置 root 密码
sudo passwd rootPython
sudo apt install python3-pip
pip3 install virtualenv
virtualenv venv
cd venv
source bin/activate# ERROR: Could not install packages due to an EnvironmentError: Missing dependencies for SOCKS support.
unset all_proxy
unset ALL_PROXY
pip install pysocks
source ~/.bashrcWin10 下 Ubuntu(WSL)中 Python 环境配置笔记 Conda 虚拟环境
sudo apt-get update
sudo apt-get upgrade
sudo reboot

wget https://repo.anaconda.com/miniconda/Miniconda3-latest-Linux-x86_64.sh
sudo chmod 777 Miniconda3-latest-Linux-x86_64.sh #懒人操作
./Miniconda3-latest-Linux-x86_64.sh

vim /home/YOURNAME/.bashrc
export PATH=/home/YOURNAME/miniconda3/bin/conda:$PATH
source /home/YOURNAME/.bashrc
echo $PATH

conda create -n py36 python=3.6
conda activate py36
#conda deactivate 用以退出环境

conda install jupyter
jupyter notebook # 运行jupyter,用给出的链接可在Win10访问
pip 下载异常
会等几分钟后再下载
DISPLAY= pip install <packagename>或者
Importing keyring taking very long in WSL2 is an already known problem, that has been fixed in keyring versions ≥ 21.6.0.
Therefore, updating keyring to the latest version should solve the problem:
DISPLAY= pip install -U keyring网络问题
重置网络可修复
# 测试网络
curl baidu.com

========================================
FIX WSL2 NETWORKING IN WINDOWS 10
========================================

cmd as admin:
wsl --shutdown
netsh winsock reset
netsh int ip reset all
netsh winhttp reset proxy
ipconfig /flushdns

Windows Search > Network Reset

Restart Windows
备份/迁移 WSL2 下的子系统步骤:
最近遇到一个问题,使用 WSL2 一段时间后,由于 WSL2 默认的安装目录是 C USER,随着使用时间的增长,C 盘被 WSL2 占用的空间也随之增长。因此需要对原
本已安装的 WSL2 进行重新备份,迁移,并且要迁移到其他目录中。
我的系统是 Windows,预装了 WSL2 下的子系统:wsl-ubuntu20.04。
https://docs.microsoft.com/zh-cn/windows/wsl/basic-commands
1.在 Windows PowerShell 中输入如下命令
wsl -l --all -v2.导出分发版为 tar 文件到 d 盘(如果你只是备份,那么下面的到第二步就可以了)
wsl --export Ubuntu-20.04 e:wsl-ubuntu20.04.tar3.注销当前分发版
wsl --unregister Ubuntu-20.044.重新导入并安装 WSL 在 d:wsl-ubuntu20.04(迁移/还原到其他目录)
wsl --import Ubuntu-20.04 e:wsl-ubuntu20.04 e:wsl-ubuntu20.04.tar --version 25.删除 tar 文件(可选)
del d:wsl-ubuntu20.04.tar6.设置默认登录用户为之前的用户
https://learn.microsoft.com/en-us/windows/wsl/wsl-config#user-settings
[user]
default = DemoUser
踩坑记录:
迁移之后,会发现 Linux 子系统跟 Windows10 docker 通讯不了,
例如:当在子系统输入 docker ps 命令时,会报:Cannot connect to the Docker daemon at unix:///var/run/docker.sock. Is the docker daemon running?
此时需要重新需要去 Windows 10 Docker Setting 设置:
General -> use the wsl2 based engine
Resourse -> wsl integration -> enable integration with my default distro
二、迁移 windows10 Docker 目录
在 Windows PowerShell
1、关闭和 wsl
wsl --shutdown2、备份到处 docker data
wsl --export docker-desktop-data e:\docker-desktop-data.tar</P>3、注销 docker-desktop-data
wsl --unregister docker-desktop-data4、重新导入 docker-desktop-data 到要存放的文件夹,我这边的文件夹为:e:\docker-desktop-data
wsl --import docker-desktop-data e:\docker-desktop-data\ e:\docker-desktop-data.tar --version 25、重新设置 子系统 为 WSL2 –可以忽略此步骤
wsl --set-version Ubuntu-20.04 2